iRobot Roomba/Scooba 110V to 220V mod
29/12/2006 at 16:39 48 comments
If have bought or want to buy a iRobot Roomba Discovery series (second generation: Discovery, Scheduler, etc) or Scooba 5800/5900 in the US and want to use it in Europe, you need to modify the included power supply that works only with 110 Volts mains.

<Roomba Discovery Series>

<Scooba Series>
Why do I need to make the mod?
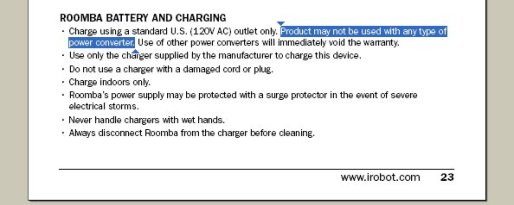
It’s not possible to use an external 220V -> 110V converter since it is explicitly prohibited in the iRobot documentation, it wont work and it may destroy the power supply (and eventually the Roomba/Scooba internal recharging circuits).
Let’s understand why it’s not possible to use external converters!
The first problem you encounter if you use an external 220V -> 110V converter to power the original Roomba/Scooba power supply is the output voltage quality (the 50/60 Hz rating is not critical).
If your converter outputs 110V RMS, this doesn’t mean that the peak voltage will be less than the maximum allowed (155 Volts) of the original power supply.
For example, with a Remington 220V -> 110V electronic converter, which outputs 110Volts RMS, the peak output voltage is more than 200V (without any load). In this case the converter would certainly blow the Roomba/Scooba power supply (please note that the peak voltage cannot be measured with a standard digital multimeter, but only with an oscilloscope).
The other problem is that if you fed the original Roomba fast charger with a voltage below 80V AC you can have an output voltage over the rated 22V DC.
For exapmle feeding the fast charger with 60Volts AC, it’s output would be at 40V DC and any connected Roomba/Scooba will be destroyed.
According to the TOP245 (TOP246 for Scooba) datasheet, the 1Mohm and 1.3Mohm resistors R1 and R2 (on the power supply board) at the Line Sense pin of the TOP245/TOP246 should shut it down if the input voltage falls below 100 VDC at the filter capacitor, but this does not happen. It seems there is a bug at the design of the power supply and at undervoltage conditions, the TOP245 can behave in a wrong way.
This condition (60Volts AC mains) would never happen in real life, but with an external 220V -> 110V converter it could be possible.
Maybe these are the reasons why it is expressely specified in the Roomba manual not to use external converters.
WARNING
Before continuing in reading the rest of the article, please read carefully the following notes:
1) The modification of the Roomba fast charger will certainly void your warranty
2) Once you open the fast charger casing, you are exposed to lethal high voltages
3) Any mistake in the modification can lead to components exploding & causing fire
4) If you are not an experienced electronics technician, don’t even try to open the charger case
5) Electrolytic capacitors have polarity, are mechanically sensitive and may easily blow
6) If you want to proceed with the mod you will take the responsibility for any problem that could arise
If you don’t want or if you feel that you don’t have enough experience & knowledge for this kind of modifications, it is better to use a good 220V AC to 22V DC 2Amp minimum power supply, rather than a 220V -> 110V converter. Usually you can find this kind of power supply as replacement parts for laptop, with prices ranging from 40 to over 100 Euros. If you find a power supply with more than 2Amp it would be perfectly fine, considering that the recharging circuits are inside the Roomba/Scooba, not in the power supply, nor in the Roomba base.
THE MOD
There are three kind of power supply
that need to be modified in different ways:
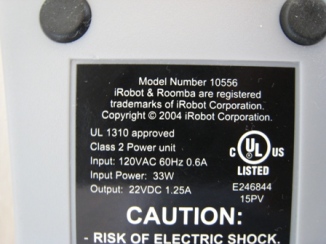
1) Roomba power supply first revision (model number 10556)
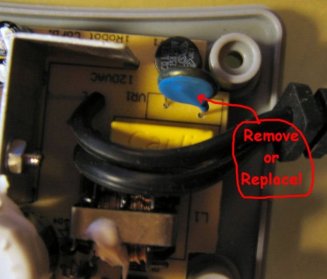
2) Roomba power supply second revision: it differs from the previous because it has a Zinc Oxide Varistor named VR1 or RV1 (see pictures below)
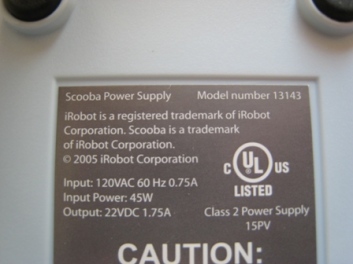
3) Scooba power supply (model number 13143)
<second revision with varistor>
<first revision without varistor>
1) Mod for Roomba power supply first revision (model number 10556)
The Roomba power supply is a standard switching power supply, based on the TopSwitch Top245Y chip. The whole power supply circuit it’s already designed for universal 110V-230V usage, except for the input capacitor after the rectifying diodes, which is a 47uF @ 200V electrolytic.
The 200V rating is fine for 110V mains, but will surely blow if used at 220V mains. So you need just to replaced it with a 47uF @ 400V (you need at least a 360Volts capacitor when rectifying 220V mains).
Why do we need a 400V capacitor?
The capacitor inside your power supply is loaded with fully rectified current not AC, with peak DC voltage equal to
(AC RMS Voltage) * (sqr root of 2) = AC RMS Voltage * 1,414
That means that for normal 220V AC, you get continuously 311 Volts peak DC on the capacitor.
The original 200V capacitor will blow in a few seconds.
To dimension correctly the voltage of the capacitor we need to add an extra 15% (311 + 15% = 57 Volts). If you add some momentarily input over voltage spikes of the mains and the capacitor derating due to ageing, the result is 400V, which is the minimum acceptable Voltage rating of the capacitor in our case.
The cost of the 400V capacitor ranges from 50 Euro cents to 3 Euro.
Considering that the cost of the 400V capacitor over the 200V is only a couple of cents, it looks like that iRobot designed a proper universal power supply and then decided to lock the product for US usage only by using the 200V capacitor.
2) Mod for Roomba power supply second revision
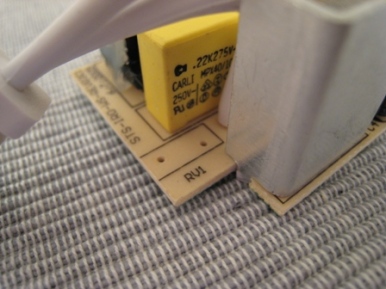
In this revision of the power supply you need to follow instruction of the previous mod 1) and additionally you need to remove the varistor named RV1 or VR1.
This varistor, rated at 175 VAC, has been added by iRobots to the second revision of the power supply to protect the unit from power spikes and would blow if you connect the power supply to 220 V.
If you remove the varistor your power supply would revert to first revision and will work perfectly fine. Alternatively you can replace this varistor with another one rated at around 360 volts (like the VAR360V04W from Fuji Semiconductor).
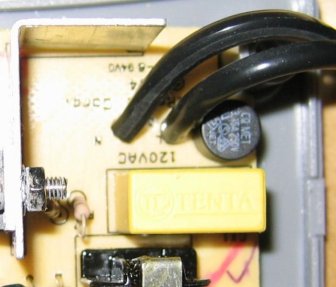
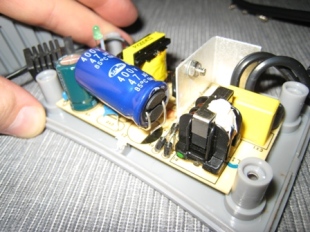
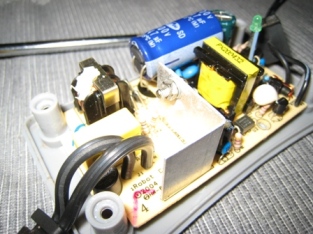
3) Mod for Scooba power supply (model number 13143)
Step 1: The Scooba power supply is very similar to Roomba one, but more powerful. It is a standard switching power supply, based on the TopSwitch Top246Y chip. The whole power supply circuit it’s already designed for universal 110V-230V usage, except for the input capacitor after the rectifying diodes, which is a 100uF @ 200V electrolytic.
The 200V rating is fine for 110V mains, but will surely blow if used at 220V mains. So you need just to replaced it with a 100uF @ 400V (you need at least a 360Volts capacitor when rectifying 220V mains). In the picture the capacitor has been replaced with a 450V one (everything more than 400V is fine).
Step 2: In the Roomba power supply you need to remove the varistor named RV1 or VR1.
This varistor, rated at 175 VAC, has been added by iRobots to the second revision of the power supply to protect the unit from power spikes and would blow if you connect the power supply to 220 V.
Alternatively you can replace this varistor with another one rated at around 360 volts (like the VAR360V04W from Fuji Semiconductor).

Entry filed under: HOWTO.
48 Comments Add your own
Leave a comment
Trackback this post | Subscribe to the comments via RSS Feed

1. james | 06/07/2007 at 00:52
This thread is about fast charger mod to 220V. Nice work. How about standard charger (7hrs) mod to 220V?
2. chriso | 21/07/2007 at 03:47
In OZ we use 240V 50 Hz.
Calcs:
240 x 1.414 = 339
339 x 1.15 = 390
Thus assuming a 400 V CAP will still do the trick ..
Any other potential gotchas with the mod but for 240V/50Hz ??
Also, any downside with a 22V DC laptop supply ? Seems a really simple option ..
3. Ravn | 01/08/2007 at 18:13
Can anyone tell me what the third pin to the scooba is?
You got, RTN, +22V and CTRL.
Is the ctrl just a signal back to the psu that it’s good, and RTN is negative?
4. interested | 28/08/2007 at 18:55
any comments on using the laptop power supply? Sounds like the simplest & safest solution
5. chriso | 31/08/2007 at 03:10
Laptop power supply works very well for me.
I chose one from Pointing Mouse (22V 120W) – one of the supplied plugs fitted the dock which was great. Don’t worry if it takes a few uses to get full capacity – this is normal .
http://cgi.ebay.com.au/ws/eBayISAPI.dll?ViewItem&item=150145846134&sspagename=ADME:L:RTQ:AU:1#ebayphotohosting
Ideally look for one that is 22V with a published voltage variation of +- 0.6 volts or better under load (I couldn’t find this at the time)
For OZ, also consider the dirt dog from Peters of Kensington – no dock or scheduling but very reasonable – I think the dock is very useful though ..
6. Colin Houghton | 06/09/2007 at 20:48
I’ve just modified a 10556 roomba supply and it is working fine on extended test @ 230V 1.25A. VAR360V04W was unobtainable so I’ve used B72210S381K101 — EPCOS — VARISTOR, 40.0J 385VAC from Farnell.co.uk
7. jameswillisisthebest | 08/09/2007 at 22:06
This is my first post
just saying HI
8. Vikke Matikainen | 21/09/2007 at 15:10
I just modded a standard 7h charger (model 10558) that comes with Roomba 4100. It had capacitor of 33uF @ 200V which I changed to 33uF @ 450V and a varistor of 175VAC which I removed just by cutting the wires and not replacing with anything. Now the charge-light pulses with ember as supposed 🙂 I’ll report if it charges and works fine.
9. Hervé | 29/11/2007 at 18:34
Hi, I modded my Roomba charger (first model without varistor)
with a 45UF capacitor 450V. I try it on 220v, nothing burn… but the ouput is not constant, it’s like a turn signal 22v,0v,22v,0v…
Do you have an idea ?
Thanks Rv
10. Hervé | 29/11/2007 at 18:36
Hi, I modded my Roomba charger (first model without varistor)
with a 45UF capacitor 450V.
I try it on 220v, nothing burn… but the ouput is not constant, it’s like a turn signal 22v,0v,22v,0v…
Do you have an idea ?
Thanks Rv
11. Colin H | 05/12/2007 at 01:06
Update: Since my last post, I’ve now modified 5 x 10556 roomba APS supplies and all work fine, according to my buyers from http://www.colinsfoto.co.uk
Caps used were Rubycon (Farnel part no. 812-6860 47uF 400V). These are the 105 deg C versions.
As said in my earlier post, VAR360V04W was unobtainable so I’ve used B72210S381K101 — EPCOS — VARISTOR, 40.0J 385VAC from Farnell.co.uk
12. bubu | 27/12/2007 at 10:19
Hi,
I did the mod of the capacitor on a power supply model number 13143 (scooba) and it works just fine.
However, I wonder why you say we’ve to replace the varistor by a 360 v (a 270 v should be fine, no ?).
Sébastien
(Tahiti)
13. bubu | 28/12/2007 at 16:33
I confirm, I put a 275 MOV and it’s just fine.
14. Krister Wolanski | 28/01/2008 at 20:34
It works for me. Thank you!
15. peter | 06/02/2008 at 13:13
Hello there.
I was a little to fast for my own good, so I connected my Roomba to the 220v via a power converter, and the transformer is now dead:-(
Can I replace this capacitor now and make it work or is the whole transformer shot to piece’s….?
rgds,
peter
16. Barb | 14/02/2008 at 16:39
Same here,
I connected the my scooba power supply 13143 to 220V, too, not having been aware of the 220V – 110V problematic and all of a sudden smoke arose from the power unit resulting in a short circuit. When I plugged it into some other converter, the unit was plain dead. Having opened it up, the varistior was heavily burned. Is there any chance to repair or still mod it? I would appreciate it if you dealt with it seriously. Thank you!
Cheers,
Barb
17. colinsfoto | 09/05/2008 at 14:51
There is a “chance” of repair but there may well be more components to be replaced than just the varistor, such as fuse and caps.
18. Jarvis | 09/05/2008 at 16:02
Hi there, why dont use a 220 to 110V transformer instead of a converter? Then no need to modify right
19. larry | 10/05/2008 at 01:57
ztgXJH sd9fj41dkg0ckahr82y4
20. Rares | 19/06/2008 at 11:16
Hey guys, I do not have the knowledge to modify Scooba’s Power adapter. I’ve bought a 220V, 22A adapter, but I don’t know how to change the plug because there are 3 wires inside the original adapter and only 2 in the new one…can someone direct me how to modifiy it? raresh_aa@yahoo.com
21. Øystein | 03/07/2008 at 19:02
I’ve tried the Scooba fix – it’ didn’t work for me – so now i got a bricked power 🙂
Now I’m wondering the same as Rares. Can anyone – with a working powersuppy help me in the right direction ?
22. Colin Houghton | 08/08/2008 at 11:56
I believe the third connection to the scooba PSU provides feedback to the charger to adjust the charging current .It derives from a temperature sensor inside the battery pack. Using a laptop charger, without this connection, would not give optimum charging.
23. henrik | 16/10/2008 at 14:03
Ok but one in here maked ik work with the laptop powersupply.
Please someone tell us what to do ! can you use it and who could show us?? please alot of us have nice robots just standing…….can we skip the third connection or are we fucked.I to have blow the original power supply with a bang.. aaaa i hate myself for not looking on the internet before i pluged it in … please help landlykke@hotmail.com
24. hans | 22/07/2009 at 19:46
Can anyone help me to modify a 110V charger for a Roomba 550 to 220V? I can not find any information on this charger (5th generation) yet. It is a “white brick with round edges” formfactor.
Thanks for any help!
25. Magnus | 23/10/2009 at 23:10
Worked perfect! Stable 22.48VDC on a 230VAC outlet.
Thank you!
26. Magnus | 23/10/2009 at 23:11
Forgot to meeantion that my Err5 Charging error disappeard. Were using 19VDC before.
27. evilmonkey | 24/03/2010 at 23:32
So I’ve followed the instructions and have replaced the capacitor and varistor. When it is all plugged in, and roomba connected, I hear this clicking sounds and the roomba charging light blinks faster than normal.
I too have a 5th gen power supply, but the innards were similar to version 2.
28. colinsfoto | 04/04/2010 at 19:21
Is the clicking sound coming from the charger or the roomba itself?
Also what was the part no/source of the cap you used as a replacement?
29. alexu | 14/05/2010 at 15:14
What if i change capacitor to a bigger one?
say 200uF for Scooba model instead of 100 ?
30. Jeff | 23/05/2010 at 23:25
is it 4.7uf/400V or 47uf/400v, i have one that says 4.7uf id thatthe same thing?
31. OpticalFlow | 04/06/2010 at 11:00
Hi,
just brought home (Australia) a Scooba from a trip to the U.S.
First up, thanks for your nice guide, it was a straightforward conversion after reading this page. Works great.
However, here’s some information which may be of interest to people who bought their Scooba more recently: with my Scooba charger unit there are some slight differences compared to the charger units shown in your pictures. iRobot has replaced the large 100 uF capacitors with two 47 uf capacitors in parallel (which is the same total capacitance to within the normal parts tolerances). These 47uF capacitors have a smaller package.
I found two cheap 56 uF/400V capacitors at farnell.com.au that have the same footprint (but more than twice as tall than the 47 uF) and used these for the mod (plus the varistor). Of course, one can still replace the two 47uF Cs with a single 100 uF C, but I couldn’t locate 100 uF C rated at 400 V that would fit on the PCB.
32. Richard | 04/07/2010 at 14:46
How about using a 12 volt battery charger from country you are in and the a power inverter that outputs 60 cycle 120 volts? No mods needed just a little cluttered? 12 volt power inverters are very cheap.
33. Rhamarao | 08/07/2010 at 01:56
Hi, can anybody fix up my 380-scooba charger? I had bought it from USA and did modify the parts such as ( 110V ->220V)
1. Replace two 47uF Cs with two 100 uF Cs
2. Replace the variastor
After a day of charging, the fuse was blown. Change the fuse but blown again. So I have changed the diodes D1 to D4 but still the fuse blown. Now I am stuck. Can anyone help me ?
34. OpticalFlow | 06/08/2010 at 10:30
after two months my modified scooba charger stopped working. It was still providing 22V but the green light didn’t come on and when plugged in Scooba showed the red service light and gave out 4 beeps.
The solution is that on the newer scooba chargers (which have two 47 uF caps instead of one 100 uF cap) you also need to replace diode D11 with a larger one that can handle higher currents. I found the solution here:http://www.robotreviews.com/chat/viewtopic.php?p=65060#p65060 (read the whole thread).
Replacing D11 with a 1N4007 diode on the underside of the PCB brought the scooba charger back to life again.
@Rhamarao:
Do not replace the two 47 uF with two 100 uF. A single 100 uF rated at 400V will do in this case. Also see my comment below regarding diode D11 as you appear to have the newer version of the power supply.
35. marcelo | 22/11/2010 at 11:27
Hi everyone, I found someone to change it to 220v
http://www.indcontrol.com.au/services.html
I receive my at post mail today,
thanks
Marcelo
36. Best Robot Vacuum | 02/04/2011 at 21:58
you are really a just right webmaster. The site loading speed is amazing. It seems that you are doing any distinctive trick. Furthermore, The contents are masterwork. you have done a wonderful job on this matter!
37. kay | 03/04/2011 at 13:40
Hello. I have accidently plugged the power supply to a 220V power grid when it only can work on 120V. This happend because I recived this vaccum from the US and I live in Europe. Do you which parts may have been burned? And if the cost of the fix will be the same as a new power suply?
Thank you.
38. PJ | 27/04/2011 at 02:33
Hi there,
I am not convinced that these mods need to be done if one purchases a decent quality stepdown transformer.
You cite two reasons not to use a 220->110V converter:
1. “iThe first problem you encounter if you use an external 220V -> 110V converter to power the original Roomba/Scooba power supply is the output voltage quality “.
No respectable, suitable rated (220-110V) step down transformer would present 200V at its output under a no load condition.
2. “This condition (60Volts AC mains) would never happen in real life, but with an external 220V -> 110V converter it could be possible.”
This would not happen with any respectable, suitable rated step down transformer. (it would if the transformer was under rated, since the output voltage under excessive load would drop dramatically – soln. – get a suitably rated one !!)
So what is suitable rated ? At least 30W to take into account conversion efficiencies etc.
39. PJ | 27/04/2011 at 02:54
Minor update to my post above. The min. rating of a quality step down transformer should be 50W (not 30W as I wrote above). This is supported by a post by bolero1000 on January 29th, 2010, 11:16 am here:
http://goo.gl/XwJP9
40. 220V 110V CONVERTER | Materials Find | 23/07/2011 at 14:16
[…] 220v 110v converter gianmauro.wordpress.com […]
41. Barry | 29/12/2011 at 00:13
I did this mod above for a scooba charger, but since doing this the transformer is only putting out 21.1v so will not charge the battery.
Does anybody know how to fix this?
42. Stephen Fuller | 13/08/2012 at 12:27
Hello, I am considering purchasing the Roomba 770 for a family member that resides in japan! I live in the USA and the purchase would be made here. Would the IRobot work in Japan and if so what kind of adaptor would be needed? I believe they have 100v electric over there! Thanks
43. Sabine | 12/05/2013 at 07:21
This design is wicked! You obviously know
how to keep a reader amused. Between your wit and your
videos, I was almost moved to start my own blog (well, almost.
..HaHa!) Great job. I really enjoyed what you had to say, and more than that, how you presented it.
Too cool!
44. Eloisa | 03/06/2013 at 07:24
Thanks for sharing such a pleasant opinion, paragraph is
pleasant, thats why i have read it entirely
45. Roomba Buttons | 20/09/2013 at 02:56
Is this article relevant to the 500 series Roombas?
46. Dave | 07/11/2013 at 05:49
Hello,
Please be warned that this mod does not work for the newer Scooba 390. Look carefully at the adapter model number. The old one in the photo is 13143. The new one is L13143.
The new one has two capacitors, and many people have mod it like the above, and after one week – it goes dead. Many PSUs have gone dead with this mod.
Please do your research thoroughly.
Thanks.
47. Colin Houghton | 24/03/2014 at 23:22
With model L13143 you upgrade the two 47uF caps to 400V and also change D11 to IN4007 (or similar) and it works fine. I’ve sold many of this Scooba charger model via http://www.colinsfoto.com, after converting them to universal voltage, without any problems.
48. Alessandro | 18/12/2014 at 17:42
Hello,
I applied the described mod to the 13143 model using a Panasonic ECEC2GP101BJ condenser and a Panasonic ERZV20D221 varistor.
Then I plugged the charger into a 220V and it worked for a few seconds, then the Varistor burnt exploding.
I removed the varistor and plugged again but now the charger does not work any more (no green LED and 0Vdc output).
No other damages are visible on the PCB.
Any help about what to check would be appreciated.
Thanks